


What is Workload Resources?
Hai semuanya, sebelum kita mulai menggunakan Workload Resources ada baiknya kita lihat dulu apa sih itu Workload Resources secara definisi dan pemahaman. Karena kebanyak orang tidak memahami dan juga salah menggunakan/menentukan object workload resource yang tepat maka akan menyebabkan problem di kemudian hari. Maka dari itu disini kita bahas
- What is Kubernetes Workloads?
- Types of workloads
- How to working with Workload resources?
- Getting started with Workload Resources
Ok langsung aja kita bahas materi yang pertama
What is Kubernetes Workloads?
Workload adalah suatu aplikasi yang running diatas Kubernetes cluster, dimana workload bisa single maupun beberapa component yang saling corporate (bekerjasama) berupa Pod dan container. Pada episode sebelumnya kita sudah mempelajari Pod dan Container specification, dimana kita bisa membuat dan menjalankan container dalam suatu pod.
Pada kasus tertentu terkadang kita ingin workload aplikasi kita bisa support High Available, Cannary deployment, Replication, Load Balance workload dan lain-lain. Yang jadi pertanyaan bagaiman caranya untuk membuat feature itu semua? apakah kita lakukan secara manual dengan membuat Pod satu-per-satu kemudian di load balance?
For example, once a pod is running in your cluster then a critical fault on the node where that pod is running means that all the pods on that node fail. Kubernetes treats that level of failure as final: you would need to create a new Pod to recover, even if the node later becomes healthy.

However, to make life considerably easier, you don’t need to manage each Pod directly. Instead, you can use workload resources that manage a set of pods on your behalf. These resources configure controllers that make sure the right number of the right kind of pod are running, to match the state you specified.
Types of workloads
Kubernetes provides different kinds of controller objects that correspond to different kinds of workloads you can run. Certain controller objects are better suited to representing specific types of workloads. The following sections describe some common types of workloads and the Kubernetes controller objects you can create to run them on your cluster, including:
- Stateless applications
- Stateful applications
- Batch jobs
- Daemons
- Custom resource definition
The stateless applications
A stateless application does not preserve its state and saves no data to persistent storage — all user and session data stays with the client. Some examples of stateless applications include web frontends like Nginx, web servers like Apache Tomcat, and other web applications.
You can create a Kubernetes Deployment to deploy a stateless application, where any Pod in the Deployment is interchangeable and can be replaced if needed.
The stateful applications
A stateful application requires that its state be saved or persistent. Stateful applications use persistent storage, such as persistent volumes, to save data for use by the server or by other users. Examples of stateful applications include databases like MongoDB and message queues like Apache ZooKeeper.
You can create a Kubernetes StatefulSet to deploy a stateful application.
The batch jobs
Batch jobs represent finite, independent, and often parallel tasks which run to their completion. Some examples of batch jobs include automatic or scheduled tasks like sending emails, rendering video, and performing expensive computations.
You can create a Kubernetes Job to execute and manage a batch task using CronJob on your cluster.
The Daemons
Daemons perform ongoing background tasks in their assigned nodes without the need for user intervention. Examples of daemons include log collectors like Fluentd and monitoring services.
You can create a Kubernetes DaemonSet to deploy a daemon on your cluster. DaemonSets create one Pod per node, and you can choose a specific node to which the DaemonSet should deploy. Every time you add a node to your cluster that matches the specification in a DaemonSet, the control plane schedules a Pod for that DaemonSet onto the new node.
The custom resource definition
In the wider Kubernetes ecosystem, you can find third-party workload resources that provide additional behaviors. Using a custom resource definition, you can add in a third-party workload resource if you want a specific behavior that’s not part of Kubernetes’ core. For example, if you wanted to run a group of Pods for your application but stop work unless all the Pods are available (perhaps for some high-throughput distributed task), then you can implement or install an extension that does provide that feature.
How to working with Workload resources?
Workload resources adalah suatu API untuk mengatur, me-manage, dan meng-control beberapa POD terkait specfikasi yang didefinisikan, jika kita ilustrasikan seperti berikut:
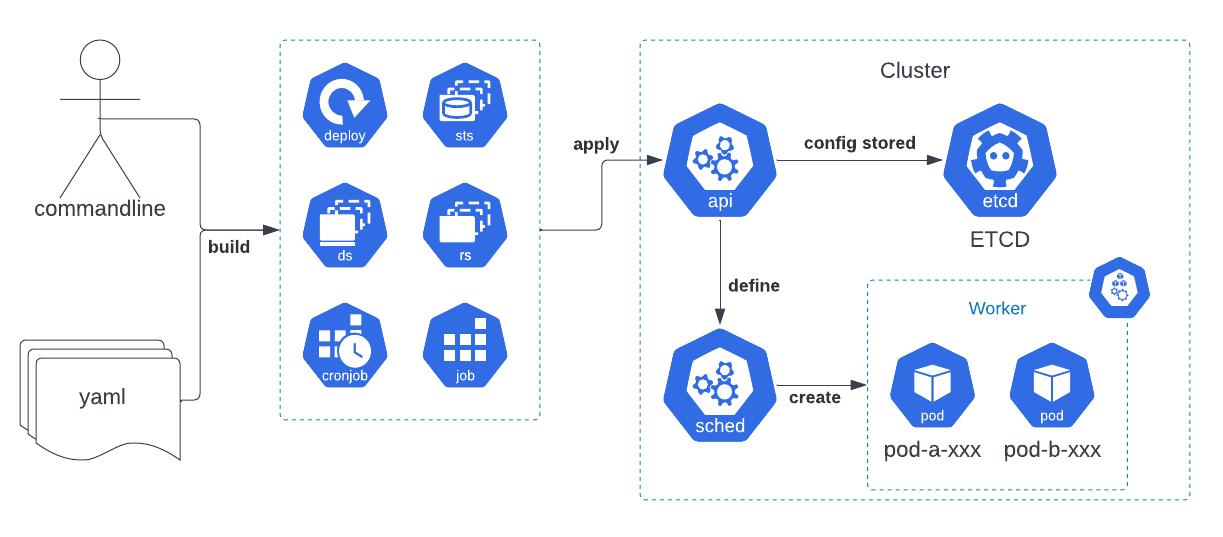
Jadi tahap pertama yang perlu kita lakukan adalah
- Mendefinisikan Workload Resources apa yang akan kita gunakan, contohnya Deployment, StatefulSet, DaemonSet, Job atau CronJob
- Kita execute/apply ke kubernetes cluster, dengan menggunakan salah satu dari 3 technique yaitu Imperative commands, Imperative object configuration, dan Declarative object configuration.
- Setelah di-execute Kubernetes API Server akan memerintahkan ke pada control-plane untuk menjadwalkan (schedule) suatu Pod ke worker/node
- beberapa Pod akan dijalankan pada suatu worker/node sesuai dengan ketentuan Pod Template pada workload
Selain itu juga ada beberapa hal yang perlu kita perhatikan jika kita menggunakan Workload resources ini diantaranya:
- Penamaan suatu pod yang dibuat oleh Workload Resources menggunakan format
<resource-name>-<uid>contohnya seperti berikut:webapp-57f649bfb7-8p6gv - Jika kita menghapus object pod, maka pod tersebut akan membuat pod baru
- Jika kita update object workload resources, maka pod akan dihapus kemudian membuat pod baru dengan specifikasi workload resources baru
- Jika kita menghapus object workload resource, maka pod akan otomatis akan dihapus secara pemanent
Getting started with Workload Resources
Untuk memahami kasus, atau contoh materi tersebut. Kita akan coba menggunakan Workload Resources yang paling umum digunakan yaitu Deployment dengan menggunakan metode Imperative commands (cli) seperti berikut:
kubectl create deploy webapp --image nginx:mainline --port 80Jika dijalankan maka outputnya seperti berikut:
~ » kubectl create deploy webapp --image nginx:mainline --port 80
deployment.apps/webapp created

~ » kubectl get event
LAST SEEN   TYPE     REASON                    OBJECT                         MESSAGE
15s         Normal   Scheduled                 pod/webapp-7cfc8fcc7b-d7q85    Successfully assigned default/webapp-7cfc8fcc7b-d7q85 to minikube
14s         Normal   Pulling                   pod/webapp-7cfc8fcc7b-d7q85    Pulling image "nginx:mainline"
15s         Normal   SuccessfulCreate          replicaset/webapp-7cfc8fcc7b   Created pod: webapp-7cfc8fcc7b-d7q85
15s         Normal   ScalingReplicaSet         deployment/webapp              Scaled up replica set webapp-7cfc8fcc7b to 1

~ » kubectl get pod -w
NAME                      READY   STATUS              RESTARTS   AGE
webapp-7cfc8fcc7b-d7q85   0/1     ContainerCreating   0          59s
webapp-7cfc8fcc7b-d7q85   1/1     Running             0          80s

~ » kubectl get deploy
NAME     READY   UP-TO-DATE   AVAILABLE   AGE
webapp   1/1     1            1           2m3s

~ » kubectl describe deploy/webapp
Name:                   webapp
Namespace:              default
CreationTimestamp:      Sun, 22 Jan 2023 19:24:10 +0700
Labels:                 app=webapp
Annotations:            deployment.kubernetes.io/revision: 1
Selector:               app=webapp
Replicas:               1 desired | 1 updated | 1 total | 1 available | 0 unavailable
StrategyType:           RollingUpdate
MinReadySeconds:        0
RollingUpdateStrategy:  25% max unavailable, 25% max surge
Pod Template:
  Labels:  app=webapp
  Containers:
   nginx:
    Image:        nginx:mainline
    Port:         80/TCP
    Host Port:    0/TCP
    Environment:  <none>
    Mounts:       <none>
  Volumes:        <none>
Conditions:
  Type           Status  Reason
  ----           ------  ------
  Available      True    MinimumReplicasAvailable
  Progressing    True    NewReplicaSetAvailable
OldReplicaSets:  <none>
NewReplicaSet:   webapp-7cfc8fcc7b (1/1 replicas created)
Events:
  Type    Reason             Age    From                   Message
  ----    ------             ----   ----                   -------
  Normal  ScalingReplicaSet  3m45s  deployment-controller  Scaled up replica set webapp-7cfc8fcc7b to 1
Nah jika temen-temen perhatikan pada pod tersebut, kita memiliki 1 object Deployment yang didalamnya terdapat 1 object Pod yang menjalankan container nginx:mainline. Kemudian misalnya saya mau mencoba delete object pod tersebut dengan menggunakan perintah berikut:
kubectl delete pod --allJika dijalankan maka outputnya seperti berikut:
~ » kubectl delete pod --all
pod "webapp-7cfc8fcc7b-d7q85" deleted

~ » kubectl get pod -w
NAME                      READY   STATUS              RESTARTS   AGE
webapp-7cfc8fcc7b-2gbnj   0/1     ContainerCreating   0          95s
webapp-7cfc8fcc7b-2gbnj   1/1     Running             0          96s
Nah jika temen-temen perhatikan, setelah kita hapus object Pod tersebut secara otomatis Pod baru dengan nama webapp-7cfc8fcc7b-2gbnj dijalankan. Kemudian misalnya kita coba update specifikasi podnya misalnya untuk container image menjadi httpd:latest dengan perintah seperti berikut:
kubectl set image deploy/webapp nginx='httpd:latest'Jika dijalankan maka hasilnya seperti berikut:
~ » kubectl get pod -w
NAME                      READY   STATUS              RESTARTS   AGE
webapp-7cfc8fcc7b-2gbnj   1/1     Running             0          10m
webapp-7cfc8fcc7b-2gbnj   1/1     Terminating         0          10m
webapp-5f54bc5bcb-722n4   0/1     ContainerCreating   0          31s
webapp-5f54bc5bcb-722n4   1/1     Running             0          31s

~ » kubectl describe pod webapp-5f54bc5bcb-722n4
Name:             webapp-5f54bc5bcb-722n4
Namespace:        default
Priority:         0
Service Account:  default
Node:             minikube-m02/192.168.64.22
Start Time:       Sun, 22 Jan 2023 19:40:11 +0700
Labels:           app=webapp
                  pod-template-hash=5f54bc5bcb
Annotations:      <none>
Status:           Running
IP:               10.244.1.3
IPs:
  IP:           10.244.1.3
Controlled By:  ReplicaSet/webapp-5f54bc5bcb
Containers:
  nginx:
    Container ID:   containerd://27b3935fea4d79622f4759f2f5c235f8aebd6ebee621c27b33926043b740cecc
    Image:          httpd:latest
    Port:           80/TCP
    Host Port:      0/TCP
    State:          Running
      Started:      Sun, 22 Jan 2023 19:40:41 +0700
    Ready:          True
Conditions:
  Type              Status
  Initialized       True
  Ready             True
  ContainersReady   True
  PodScheduled      True
Events:
  Type    Reason     Age   From               Message
  ----    ------     ----  ----               -------
  Normal  Scheduled  111s  default-scheduler  Successfully assigned default/webapp-5f54bc5bcb-722n4 to minikube-m02
  Normal  Pulling    110s  kubelet            Pulling image "httpd:latest"
  Normal  Pulled     81s   kubelet            Successfully pulled image "httpd:latest" in 29.104497032s
  Normal  Created    81s   kubelet            Created container nginx
  Normal  Started    81s   kubelet            Started container nginx
Dengan Workload resources deployment ini kita bisa mengganti image container yang sebelumnya kita buat, jadi kita tidak perlu menghapus object pod yang sebelumnya secara manual tapi kita bisa langsung saja apply perubahannya ke kubernetes cluster. Dengan mengupdate object deployment secara otomatis pod yang sebelumnya akan hapus dan dibuat ulang sesuai dengan specifikasi terbaru. Dan yang terakhir jika kita menghapus Object workload resource deploymentnya. Maka secara otomatis pula semua object pod yang dibuat olehnya dihapus secara permanent dengan perintah seperti berikut:
kubectl delete deploy webappJika dijalankan maka outputnya seperti berikut:
~ » kubectl delete deploy webapp
deployment.apps "webapp" deleted

~ » kubectl get deploy
No resources found in default namespace.

~ » kubectl get pod
No resources found in default namespace.
Okay mungkin sekian dulu yang bisa saya sampaikan terkait Kubernetes workload resources, masih banyak yang masih kita perlu pelajari tentang Kubernetes Workload resources ini. Semoga temen-temen tertarik mengikuti materinya sampai akhir, see you next post!!