


Minikube addons features
Hai semuanya, di materi kali ini kita akan membahas tentang Minikube Addons for added functionality features of Kubernetes. Diantaranya yang akan kita bahas adalah
- Basic usage
addonscommand - Enable Dashboard & metrics-server
- Enable Registry-Creds for Private Registry
- Enable Registry-Creds for Insecure Docker Registry
- Enable Load balancer service
- Enable Ingress service
Ok langsung aja kita ke pembahasan yang pertama
Basic usage addons command
Minikube has a built-in list of applications and services that may be easily deployed, such as Istio or Ingress. Untuk lebih detail temen-temen bisa lihat dokumentasinya menggunakan perintah
minikube addons --helpJika dijalankan maka hasilnya seperti berikut:
➜ ~  minikube addons --help
addons modifies minikube addons files using subcommands like `minikube addons enable dashboard`

Available Commands:
  configure   Configures the addon w/ADDON_NAME within minikube (example: `minikube addons configure registry-creds`). For a list of available addons use: minikube addons list
  disable     Disables the addon w/ADDON_NAME within minikube (example: `minikube addons disable dashboard`). For a list of available addons use: minikube addons list
  enable      Enables the addon w/ADDON_NAME within minikube. For a list of available addons use: `minikube addons list`
  images      List image names the addon w/ADDON_NAME used. For a list of available addons use: `minikube addons list`
  list        Lists all available minikube addons as well as their current statuses (enabled/disabled)
  open        Opens the addon w/ADDON_NAME within minikube (example: `minikube addons open dashboard`). For a list of available addons use: minikube addons list

Usage:
  minikube addons SUBCOMMAND [flags] [options]

Use "minikube <command> --help" for more information about a given command.
Use "minikube options" for a list of global command-line options (applies to all commands).
To list the available addons for your version of minikube:
minikube addons listJika dijalankan maka hasilnya seperti berikut:
➜ ~  minikube addons list
|-----------------------------|--------------------------------|
|         ADDON NAME          |           MAINTAINER           |
|-----------------------------|--------------------------------|
| ambassador                  | third-party (ambassador)       |
| auto-pause                  | google                         |
| csi-hostpath-driver         | kubernetes                     |
| dashboard                   | kubernetes                     |
| default-storageclass        | kubernetes                     |
| efk                         | third-party (elastic)          |
| freshpod                    | google                         |
| gcp-auth                    | google                         |
| gvisor                      | google                         |
| helm-tiller                 | third-party (helm)             |
| ingress                     | unknown (third-party)          |
| ingress-dns                 | google                         |
| istio                       | third-party (istio)            |
| istio-provisioner           | third-party (istio)            |
| kubevirt                    | third-party (kubevirt)         |
| logviewer                   | unknown (third-party)          |
| metallb                     | third-party (metallb)          |
| metrics-server              | kubernetes                     |
| nvidia-driver-installer     | google                         |
| nvidia-gpu-device-plugin    | third-party (nvidia)           |
| olm                         | third-party (operator          |
|                             | framework)                     |
| pod-security-policy         | unknown (third-party)          |
| portainer                   | portainer.io                   |
| registry                    | google                         |
| registry-aliases            | unknown (third-party)          |
| registry-creds              | third-party (upmc enterprises) |
| storage-provisioner         | google                         |
| storage-provisioner-gluster | unknown (third-party)          |
| volumesnapshots             | kubernetes                     |
|-----------------------------|--------------------------------|
To enable an add-on, see:
minikube addons enable <name>To enable an addon at start-up, where –-addons option can be specified multiple times:
minikube start --addons <name> --addons <name2>For addons that expose a browser endpoint, you can quickly open them with:
minikube addons open <name>To disable an addon:
minikube addons disable <name>Enable Dashboard & metrics-server
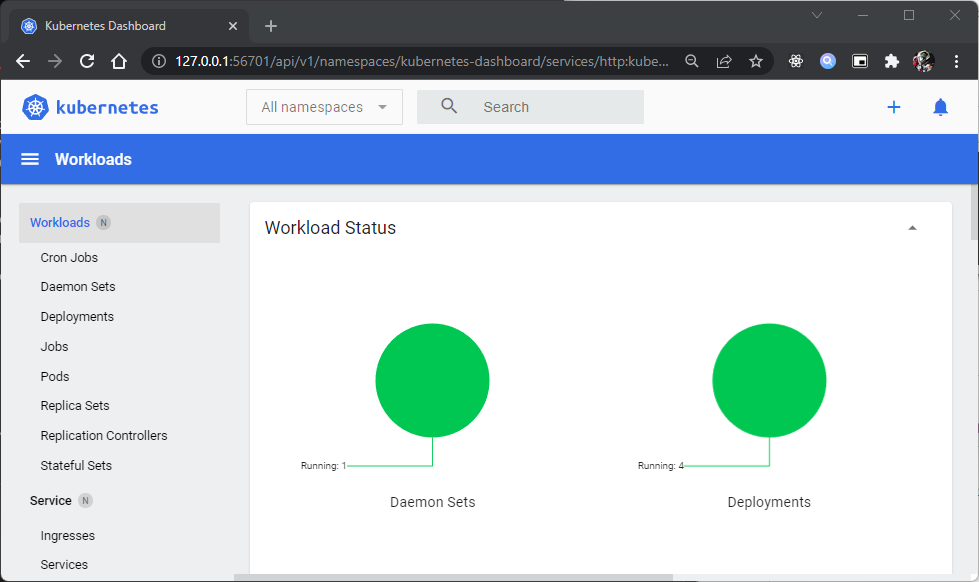
minikube has integrated support for the Kubernetes Dashboard UI.
The Dashboard is a web-based Kubernetes user interface. You can use it to:
- deploy containerized applications to a Kubernetes cluster
- troubleshoot your containerized application
- manage the cluster resources
- get an overview of applications running on your cluster
- creating or modifying individual Kubernetes resources (such as
Deployments,Jobs,DaemonSets, etc)
To access the dashboard:
This will enable the dashboard add-on, and open the proxy in the default web browser. seperti berikut:
Enable Registry-Creds for Private Registry
Dengan menggunakan minikube kita juga bisa menggunakan Private registry seperti
- Google Container Registry (GCR),
- Amazon’s EC2 Container Registry (ECR)
- Azure Container Registry (ACR)
- Private Docker registries
You will need to run addons configure registry-creds and addons enable registry-creds to get up and running. Tapi sebelum itu kita akan coba push dulu image yang telah kita build ke private registry. Contohnya disini kita akan menggunakan Docker Hub
Sekarang kita coba push imagenya, dan kita buat visiblitynya menjadi private
docker login

docker push dimmaryanto93/kubernetes-cource:1.0
Seperti berikut hasilnya:

minikube cluster membutuhkan credential untuk account dari Docker HUB kita bisa menggunakan perintah berikut:
Dan setelah kita configure, kita gunakan perintah berikut untuk menaktifkan registry credentialnya:
Jika dijalankan maka hasilnya seperti berikut:
➜  ~ minikube addons configure registry-creds

Do you want to enable AWS Elastic Container Registry? [y/n]: n
Do you want to enable Google Container Registry? [y/n]: n
Do you want to enable Docker Registry? [y/n]: y
-- Enter docker registry server url: https://index.docker.io/v1/
-- Enter docker registry username: dimmaryanto93
-- Enter docker registry password:
Do you want to enable Azure Container Registry? [y/n]: n
✅  registry-creds was successfully configured

➜  ~ minikube addons enable registry-creds
    ▪ Using image upmcenterprises/registry-creds:1.10
🌟  The 'registry-creds' addon is enabled

## credential store in secret as below
➜  ~ kubectl get secrets -n kube-system
NAME                                             TYPE                                  DATA   AGE
registry-creds-acr                               Opaque                                3      52s
registry-creds-dpr                               Opaque                                3      52s
registry-creds-ecr                               Opaque                                6      52s
registry-creds-gcr                               Opaque                                2      52s

➜  ~ kubectl run nginx-private-app --image dimmaryanto93/kubernetes-cource:1.0
pod/nginx-private-app created

➜  ~ kubectl get pod
NAME                READY   STATUS    RESTARTS   AGE
nginx-private-app   1/1     Running   0          71s

➜  ~ kubectl describe pod/nginx-private-app
Name:         nginx-private-app
Namespace:    default
Priority:     0
Node:         minikube/192.168.59.116
Start Time:   Tue, 01 Feb 2022 22:00:28 +0700
Labels:       run=nginx-private-app
Annotations:  <none>
Status:       Running
IP:           172.17.0.3
IPs:
  IP:  172.17.0.3
Containers:
  nginx-private-app:
    Container ID:   docker://7d7c24228450ec909bdff802bf7c3cfba856f95985b882f70f6f7f1e28424d44
    Image:          dimmaryanto93/kubernetes-cource:1.0
    Image ID:       docker-pullable://dimmaryanto93/kubernetes-cource@sha256:bce870a1cfc768aa9cb6affe71e18ac7dc3c6997ad016d3ce44af0e8ecae50c9
    Port:           <none>
    Host Port:      <none>
    State:          Running
      Started:      Tue, 01 Feb 2022 22:01:09 +0700
    Ready:          True
    Restart Count:  0
    Environment:    <none>
    Mounts:
      /var/run/secrets/kubernetes.io/serviceaccount from kube-api-access-7zv7k (ro)
Conditions:
  Type              Status
  Initialized       True
  Ready             True
  ContainersReady   True
  PodScheduled      True
Volumes:
  kube-api-access-7zv7k:
    Type:                    Projected (a volume that contains injected data from multiple sources)
    TokenExpirationSeconds:  3607
    ConfigMapName:           kube-root-ca.crt
    ConfigMapOptional:       <nil>
    DownwardAPI:             true
QoS Class:                   BestEffort
Node-Selectors:              <none>
Tolerations:                 node.kubernetes.io/not-ready:NoExecute op=Exists for 300s
                             node.kubernetes.io/unreachable:NoExecute op=Exists for 300s
Events:
  Type    Reason     Age   From               Message
  ----    ------     ----  ----               -------
  Normal  Scheduled  95s   default-scheduler  Successfully assigned default/nginx-private-app to minikube
  Normal  Pulling    94s   kubelet            Pulling image "dimmaryanto93/kubernetes-cource:1.0"
  Normal  Pulled     54s   kubelet            Successfully pulled image "dimmaryanto93/kubernetes-cource:1.0" in 39.727921156s
  Normal  Created    54s   kubelet            Created container nginx-private-app
  Normal  Started    54s   kubelet            Started container nginx-private-app
Enable Registry-Creds for Insecure Docker Registry
minikube allows users to configure the docker engine’s --insecure-registry flag.
You can use the --insecure-registry flag on the minikube start command to enable insecure communication between the docker engine and registries listening to requests from the CIDR range.
Insecure Registry ini adalah alternative jika container image mau di simpan di on-premis, Ada beberapa container registry yang kita bisa gunakan seperti
- Nexus OSS
- JFrog Artifactory
- Gitlab Container Registry
- dan masih banyak lagi.
Disini saya sudah install insecure-registry menggunakan Nexus dan untuk cara installnya saya sudah pernah bahas di artikel berikut untuk registry urlnya seperti berikut:
- Hosted registry:
192.168.88.50:8087 - Group registry:
192.168.88.50:8086
Jadi jika kita mau menggunakan insecure registry tersebut kita bisa menggunakan perintah berikut:
Sebelum kita coba, kita coba push dulu ke registry tersebut:
docker tag dimmaryanto93/kubernetes-cource:1.0 192.168.88.50:8087/udemy/kubernetes/nginx-app:1.0

docker push 192.168.88.50:8087/udemy/kubernetes/nginx-app:1.0
Maka hasilnya seperti berikut:

Sekarang kita coba jalankan:
➜  ~ minikube start --memory 4g --driver virtualbox \
> --insecure-registry="192.168.88.50:8087,192.168.88.50:8086" \
> -p insecure-registry
😄  [insecure-registry] minikube v1.25.1 on Darwin 12.2
✨  Using the virtualbox driver based on user configuration
👍  Starting control plane node insecure-registry in cluster insecure-registry
🔥  Creating virtualbox VM (CPUs=2, Memory=4096MB, Disk=20000MB) ...
🐳  Preparing Kubernetes v1.23.1 on Docker 20.10.12 ...
    ▪ kubelet.housekeeping-interval=5m
    ▪ Generating certificates and keys ...
    ▪ Booting up control plane ...
    ▪ Configuring RBAC rules ...
    ▪ Using image gcr.io/k8s-minikube/storage-provisioner:v5
🔎  Verifying Kubernetes components...
🌟  Enabled addons: storage-provisioner, default-storageclass
🏄  Done! kubectl is now configured to use "insecure-registry" cluster and "default" namespace by default

➜  ~ minikube profile insecure-registry
✅  minikube profile was successfully set to insecure-registry

➜  ~ minikube ssh
                         _             _
            _         _ ( )           ( )
  ___ ___  (_)  ___  (_)| |/ )  _   _ | |_      __
/  _   _  \| |/  _  \| || , <  ( ) ( )|  _ \  / __ \
| ( ) ( ) || || ( ) || || |\ \ | (_) || |_) )(  ___/
(_) (_) (_)(_)(_) (_)(_)(_) (_) \___/ (_,__/  \____)

$ docker info
Client:
 Context:    default
 Debug Mode: false

Server:
 Containers: 14
  Running: 14
  Paused: 0
  Stopped: 0
 Images: 10
 Server Version: 20.10.12
 Storage Driver: overlay2
  Backing Filesystem: extfs
  Supports d_type: true
  Native Overlay Diff: true
  userxattr: false
 Logging Driver: json-file
 Cgroup Driver: systemd
 Cgroup Version: 1
 Plugins:
  Volume: local
  Network: bridge host ipvlan macvlan null overlay
  Log: awslogs fluentd gcplogs gelf journald json-file local logentries splunk syslog
 Swarm: inactive
 Runtimes: io.containerd.runc.v2 io.containerd.runtime.v1.linux runc
 Default Runtime: runc
 Init Binary: docker-init
 containerd version: 7b11cfaabd73bb80907dd23182b9347b4245eb5d
 runc version: 52b36a2dd837e8462de8e01458bf02cf9eea47dd
 init version: de40ad0
 Security Options:
  seccomp
   Profile: default
 Kernel Version: 4.19.202
 Operating System: Buildroot 2021.02.4
 OSType: linux
 Architecture: x86_64
 CPUs: 2
 Total Memory: 3.847GiB
 Name: insecure-registry
 ID: PY6R:ATXB:YQKK:QLMW:PNBD:UV2I:YJ4Q:2XVC:K4BF:WMYX:PB6J:GLRZ
 Docker Root Dir: /var/lib/docker
 Debug Mode: false
 Registry: https://index.docker.io/v1/
 Labels:
  provider=virtualbox
 Experimental: false
 Insecure Registries:
  192.168.88.50:8086
  192.168.88.50:8087
  10.96.0.0/12
  127.0.0.0/8
 Live Restore Enabled: false
 Product License: Community Engine
Nah sekarang jika kita lihat, pada container runtime sudah terkonfigurasi Insecure Registry. Sekarang kita bisa lakukan registry-creds menggunakan addons configure registry-creds atau menggunakan cara manual yaitu imagePullSecret object pada podSpec atau deploySpec (Recommended).
Karena supaya simple kita akan bahas dulu pake minikube addons configure registry-creds seperti berikut:
Dan setelah kita configure, kita gunakan perintah berikut untuk menaktifkan registry credentialnya:
Jika dijalankan maka hasilnya seperti berikut:
➜  ~ minikube addons configure registry-creds

Do you want to enable AWS Elastic Container Registry? [y/n]: n
Do you want to enable Google Container Registry? [y/n]: n
Do you want to enable Docker Registry? [y/n]: y
-- Enter docker registry server url: 192.168.88.50:8087
-- Enter docker registry username: admin
-- Enter docker registry password:
Do you want to enable Azure Container Registry? [y/n]: n
✅  registry-creds was successfully configured

➜  ~ minikube addons enable registry-creds
    ▪ Using image upmcenterprises/registry-creds:1.10
🌟  The 'registry-creds' addon is enabled

➜  ~ kubectl get secrets -n kube-system
NAME                                             TYPE                                  DATA   AGE
registry-creds-acr                               Opaque                                3      75s
registry-creds-dpr                               Opaque                                3      75s
registry-creds-ecr                               Opaque                                6      75s
registry-creds-gcr                               Opaque                                2      75s

➜  ~ kubectl run nginx-insecure-app --image 192.168.88.50:8087/udemy/kubernetes/nginx-app:1.0
pod/nginx-insecure-app created

➜  ~ kubectl get pods
NAME                 READY   STATUS    RESTARTS   AGE
nginx-insecure-app   1/1     Running   0          13s

➜  ~ kubectl describe pods nginx-insecure-app
Name:         nginx-insecure-app
Namespace:    default
Priority:     0
Node:         insecure-registry/192.168.59.117
Start Time:   Tue, 01 Feb 2022 23:07:49 +0700
Labels:       run=nginx-insecure-app
Annotations:  <none>
Status:       Running
IP:           172.17.0.4
IPs:
  IP:  172.17.0.4
Containers:
  nginx-insecure-app:
    Container ID:   docker://fce02061f60ffda073afd25df53e06d4312931f5dc7be79f872f7582af0458d8
    Image:          192.168.88.50:8087/udemy/kubernetes/nginx-app:1.0
    Image ID:       docker-pullable://192.168.88.50:8087/udemy/kubernetes/nginx-app@sha256:bce870a1cfc768aa9cb6affe71e18ac7dc3c6997ad016d3ce44af0e8ecae50c9
    Port:           <none>
    Host Port:      <none>
    State:          Running
      Started:      Tue, 01 Feb 2022 23:07:57 +0700
    Ready:          True
    Restart Count:  0
    Environment:    <none>
    Mounts:
      /var/run/secrets/kubernetes.io/serviceaccount from kube-api-access-n9ww5 (ro)
Conditions:
  Type              Status
  Initialized       True
  Ready             True
  ContainersReady   True
  PodScheduled      True
Volumes:
  kube-api-access-n9ww5:
    Type:                    Projected (a volume that contains injected data from multiple sources)
    TokenExpirationSeconds:  3607
    ConfigMapName:           kube-root-ca.crt
    ConfigMapOptional:       <nil>
    DownwardAPI:             true
QoS Class:                   BestEffort
Node-Selectors:              <none>
Tolerations:                 node.kubernetes.io/not-ready:NoExecute op=Exists for 300s
                             node.kubernetes.io/unreachable:NoExecute op=Exists for 300s
Events:
  Type    Reason     Age   From               Message
  ----    ------     ----  ----               -------
  Normal  Scheduled  33s   default-scheduler  Successfully assigned default/nginx-insecure-app to insecure-registry
  Normal  Pulling    32s   kubelet            Pulling image "192.168.88.50:8087/udemy/kubernetes/nginx-app:1.0"
  Normal  Pulled     26s   kubelet            Successfully pulled image "192.168.88.50:8087/udemy/kubernetes/nginx-app:1.0" in 6.294481617s
  Normal  Created    25s   kubelet            Created container nginx-insecure-app
  Normal  Started    25s   kubelet            Started container nginx-insecure-app
Enable Load balancer service
A LoadBalancer service is the standard way to expose a service to the internet. With this method, each service gets its own IP address.
Services of type LoadBalancer can be exposed via the minikube tunnel command. It must be run in a separate terminal window to keep the LoadBalancer running. But first you need enable LoadBalencer it self using
Jika di jalankan seperti berikut:
➜ ~  minikube addons enable metallb
    ▪ Using image metallb/speaker:v0.9.6
    ▪ Using image metallb/controller:v0.9.6
🌟  The 'metallb' addon is enabled

## you should know range ip minikube using this command
➜ ~  minikube node list
minikube        192.168.59.102

➜ ~  minikube addons configure metallb
-- Enter Load Balancer Start IP: 192.168.59.100
-- Enter Load Balancer End IP: 192.168.59.110
    ▪ Using image metallb/speaker:v0.9.6
    ▪ Using image metallb/controller:v0.9.6
✅  metallb was successfully configured
Setelah kita kita coba deploy aplikasinya dan expose menggunakan LoadBalancer service seperti berikut:
➜ ~  kubectl run nginx-app --image nginx:mainline --port 80
pod/nginx-app created

➜ ~  kubectl expose pod nginx-app --type=LoadBalancer --port 80
service/nginx-app exposed

➜ ~  kubectl get service
NAME         TYPE           CLUSTER-IP      EXTERNAL-IP      PORT(S)        AGE
kubernetes   ClusterIP      10.96.0.1       <none>           443/TCP        4m58s
nginx-app    LoadBalancer   10.108.206.69   192.168.59.100   80:31341/TCP   10s

➜ ~  curl 192.168.59.100
StatusCode        : 200
StatusDescription : OK
Content           : <!DOCTYPE html>
                    <html>
                    <head>
                    <title>Welcome to nginx!</title>
                    <style>
                    html { color-scheme: light dark; }
                    body { width: 35em; margin: 0 auto;
                    font-family: Tahoma, Verdana, Arial, sans-serif; }
                    </style...
Headers           : {[Connection, keep-alive], [Accept-Ranges, bytes], [Content-Length, 615],
                    [Content-Type, text/html]...}
Enable Ingress service
Selain menggunakan LoadBalancer, kita juga bisa menggunakan Ingress Controller salah satu implementasinya adalah ingress-nginx. Di minikube tersedia juga addons untuk ingress dengan menggunakan perintah seperti berikut:
Jika dijalankan hasilnya seperti berikut:
➜ ~  minikube addons enable ingress
💡  After the addon is enabled, please run "minikube tunnel" and your ingress resources would be available at "127.0.0.1"
    ▪ Using image k8s.gcr.io/ingress-nginx/controller:v1.1.0
    ▪ Using image k8s.gcr.io/ingress-nginx/kube-webhook-certgen:v1.1.1
    ▪ Using image k8s.gcr.io/ingress-nginx/kube-webhook-certgen:v1.1.1
🔎  Verifying ingress addon...
🌟  The 'ingress' addon is enabled

➜ ~  minikube service --url ingress-nginx-controller -n ingress-nginx
🏃  Starting tunnel for service ingress-nginx-controller.
|---------------|--------------------------|-------------|-------------------------|
|   NAMESPACE   |           NAME           | TARGET PORT |          URL            |
|---------------|--------------------------|-------------|-------------------------|
| ingress-nginx | ingress-nginx-controller |             | http://127.0.0.1:54424  |
|               |                          |             | https://127.0.0.1:54425 |
|---------------|--------------------------|-------------|-------------------------|
http://127.0.0.1:54424
https://127.0.0.1:54425
❗  Because you are using a Docker driver on windows, the terminal needs to be open to run it.

## check ingress run
➜ ~  curl http://127.0.0.1:54424
curl : 404 Not Found
nginx
At line:1 char:1
Jika sudah sekarang kita coba deploy 2 container misalnya menggunakan nginx yang nantinya akan di mapping menjadi /web1 dan /web2 Seperti berikut:
Sekarang kita coba jalankan dengan perintah seperti berikut:
kubectl apply -f ingress-nginx-controller.yamlMaka hasilnya seperti berikut:
➜ kubernetes  kubectl apply -f .\01-getting-started\ingress-controller.yaml
deployment.apps/nginx-app1 created
service/nginx-app1 created
deployment.apps/nginx-app2 created
service/nginx-app2 created
ingress.networking.k8s.io/webapp-ingress created

➜ ~  kubectl get ing
NAME             CLASS    HOSTS                ADDRESS     PORTS   AGE
webapp-ingress   <none>   nginx.example.info   localhost   80      2m49s

➜ ~  kubectl describe ing
Name:             webapp-ingress
Labels:           <none>
Namespace:        default
Address:          localhost
Default backend:  default-http-backend:80 (<error: endpoints "default-http-backend" not found>)
Rules:
  Host                Path  Backends
  ----                ----  --------
  nginx.example.info
                      /web1(/|$)(.*)   nginx-app1:80 (172.17.0.7:80)
                      /web2(/|$)(.*)   nginx-app2:80 (172.17.0.8:80)
Annotations:          kubernetes.io/ingress.class: nginx
                      nginx.ingress.kubernetes.io/rewrite-target: /$2
Events:
  Type    Reason  Age                   From                      Message
  ----    ------  ----                  ----                      -------
  Normal  Sync    2m55s (x2 over 3m9s)  nginx-ingress-controller  Scheduled for sync
Jika sudah sekarang coba edit file /etc/hosts jika di windows lokasinya C:\Windows\System32\drivers\etc\hosts seperti berikut:
$(minikube ip) nginx.example.infoKalau udah sekarang kita bisa coba check dengan perintah curl seperti berikut:
➜ ~  curl http://nginx.example.info:54424/web1
StatusCode        : 200
StatusDescription : OK
Content           : <!DOCTYPE html>
                    <html>
                    <head>
                    <title>Welcome to nginx!</title>
                    <style>
                    html { color-scheme: light dark; }
                    body { width: 35em; margin: 0 auto;
                    font-family: Tahoma, Verdana, Arial, sans-serif; }
                    </style...
Headers           : {[Connection, keep-alive], [Accept-Ranges, bytes], [Content-Length, 615],
                    [Content-Type, text/html]...}

➜ ~  curl http://nginx.example.info:54424/web2
StatusCode        : 200
StatusDescription : OK
Content           : <!DOCTYPE html>
                    <html>
                    <head>
                    <title>Welcome to nginx!</title>
                    <style>
                    html { color-scheme: light dark; }
                    body { width: 35em; margin: 0 auto;
                    font-family: Tahoma, Verdana, Arial, sans-serif; }
                    </style...
Headers           : {[Connection, keep-alive], [Accept-Ranges, bytes], [Content-Length, 615],
                    [Content-Type, text/html]...}