


The `.gitlab-ci.yml` file
Hai semuanya, di artikel sebelumnya kita sudah men-setup suatu environment untuk continues integration menggunakan feature gitlab ci dengan bantuan docker executor. Nah jadi sebelum kita bahas tentang pipeline sekarang kita bahas dulu basic dari syntax .gitlab-ci.yml file ya. Diantaranya yaitu
- Introduction
- Basic usage of
.gitlab-ci.ymlfile - Should i triggered to deploy manually or automatically?
- Using CI/CD Variables
- Using services
- Use cases to test, build, and publish docker images
- Cleanup
Ok lansung aja kita ke pembahasan yang pertama yaitu
Introduction
To use GitLab CI/CD, you need:
- Application code hosted in a Git repository.
- A file called
.gitlab-ci.ymlin the root of your repository, which contains the CI/CD configuration.
In the .gitlab-ci.yml file, you can define:
- The scripts you want to run.
- Other configuration files and templates you want to include. Dependencies and caches.
- The commands you want to run in sequence and those you want to run in parallel.
- The location to deploy your application to.
- Whether you want to run the scripts automatically or trigger any of them manually.
The scripts are grouped into jobs, and jobs run as part of a larger pipeline. You can group multiple independent jobs into stages that run in a defined order. The CI/CD configuration needs at least one job that is not hidden.
When you add a .gitlab-ci.yml file to your repository, GitLab detects it and an application called GitLab Runner runs the scripts defined in the jobs.
Basic usage of .gitlab-ci.yml file
A .gitlab-ci.yml file might contain:
stages:
  - build
  - test

build-code-job:
  stage: build
  image: ruby
  script:
    - echo "Check the ruby version, then build some Ruby project files:"
    - ruby -v
  tags:
    - docker

test-code-job1:
  stage: test
  image: ruby:2.7.4-slim-bullseye
  script:
    - ruby -v
    - echo "If the files are built successfully, test some files with one command:"
  tags:
    - docker

test-code-job2:
  stage: test
  image: ruby:2.7.4-slim-bullseye
  script:
    - ruby -v
    - echo "If the files are built successfully, test other files with a different command:"
  tags:
    - docker
In this example, the build-code-job job in the build stage runs first. It outputs the Ruby version the job is using, then runs rake to build project files. If this job completes successfully, the two test-code-job jobs in the test stage start in parallel and run tests on the files.
Untuk lebih detailnya tentang .gitlab-ci.yaml kita bisa check di dokumentasi official website gitlab, baca disini
Should i triggered to deploy manually or automatically?
Untuk Gitlab CI, ini mem-provided banyak sekali workflow seperti
- Automatically deploy when push the code
- Semi Automatic deploy when using event ex push at specific branch, push with tags, etc…
- Manually deploy
By default, jika kita jalankan script diatas maka gitlab akan men-trigger gitlab runner ketika ada perubahan source-code atau ada push baru (Automatically deploy).
Saya sendiri biasanya atau lebih sering menggunakan workflow Semi Automatic atau Manualy deployment. Jadi kurang lebih seperti berikut contoh script .gitlab-ci.yml
stages:
- test
- build
- deploy
## automaticaly deploy
test-case1:
stage: test
image: ruby:2.7.4-slim-bullseye
script:
- ruby -v
- echo "test some files with one command:"
tags:
- docker
## semi automaticaly deploy when push with tags
build-code-job:
stage: build
image: ruby
script:
- echo "Check the ruby version, then build some Ruby project files:"
- ruby -v
tags:
- docker
only:
- /-release/ # trigger when push tag / branch named prefix `-release`
## semi automaticaly deploy when push at specific branch
deploy-dev:
stage: deploy
image: ruby
script:
- echo "deploy script to dev env"
tags:
- docker
only:
- develop # trigger when push at branch named prefix `develop`
## manualy deploy
deploy-prod:
stage: deploy
image: ruby
when: manual
script:
- echo "deploy script to prod env"
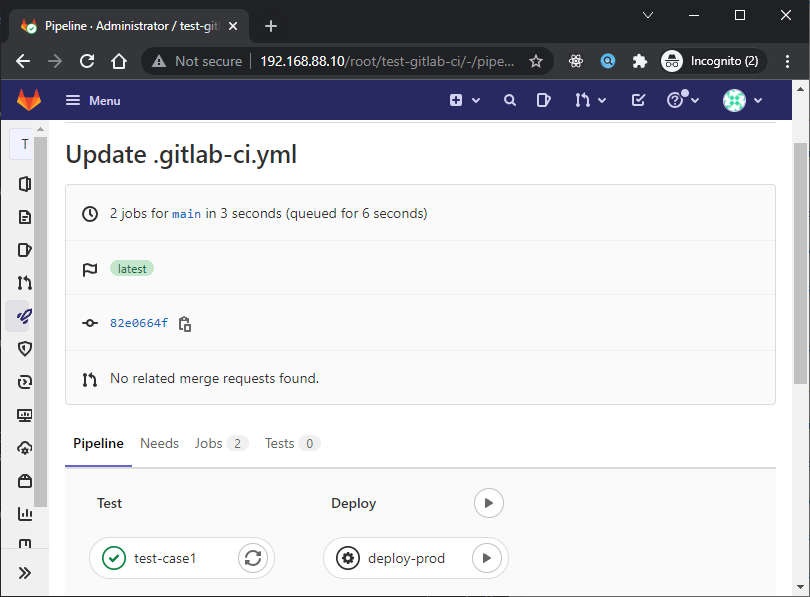
tags:
- dockerJika kita coba push, maka automaticlly job test-case1 mulai running sedangkan job deploy-prod statusnya skip atau pause sampai kita klik button play pada job visualizer seperti berikut:
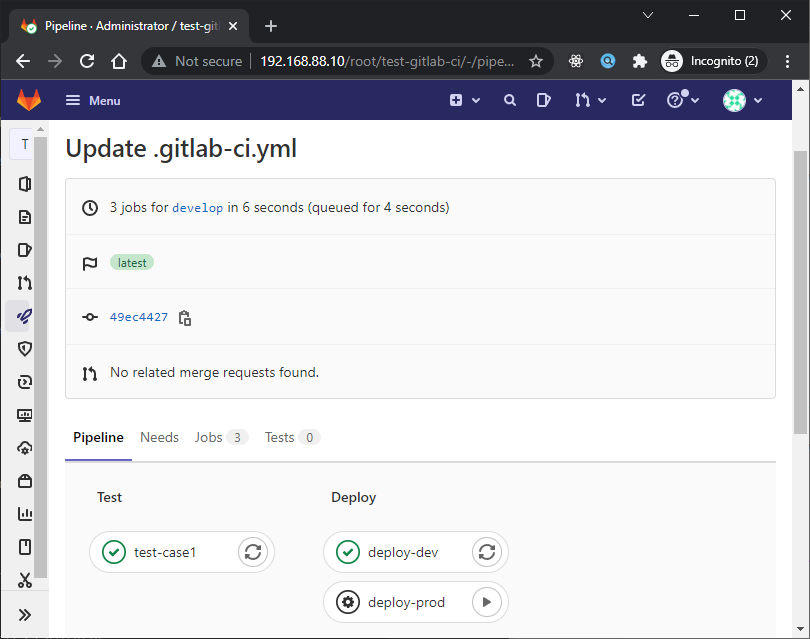
Sedangkan jika kita buat branch baru dengan nama develop dan push perubahkan ke branch tersebut maka hasilnya seperti berikut:
Using CI/CD Variables
CI/CD variables are a type of environment variable. You can use them to:
- Control the behavior of jobs and pipelines.
- Store values you want to re-use.
- Avoid hard-coding values in your
.gitlab-ci.ymlfile.
You can use predefined CI/CD variables or define custom:
- Variables in the
.gitlab-ci.ymlfile. - Project CI/CD variables, You can add CI/CD variables to a project’s settings. Only project members with the Maintainer role can add or update project CI/CD variables. To keep a CI/CD variable secret, put it in the project settings, not in the
.gitlab-ci.ymlfile. - Group CI/CD variables, To make a CI/CD variable available to all projects in a group, define a group CI/CD variable.
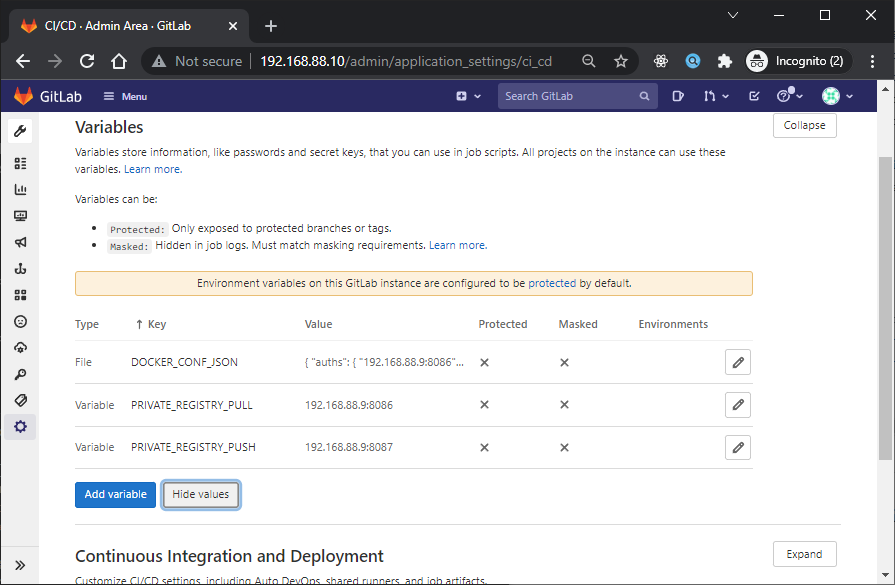
- Instance CI/CD variables, To make a CI/CD variable available to all projects and groups in a GitLab instance, add an instance CI/CD variable. You must have the Administrator role.
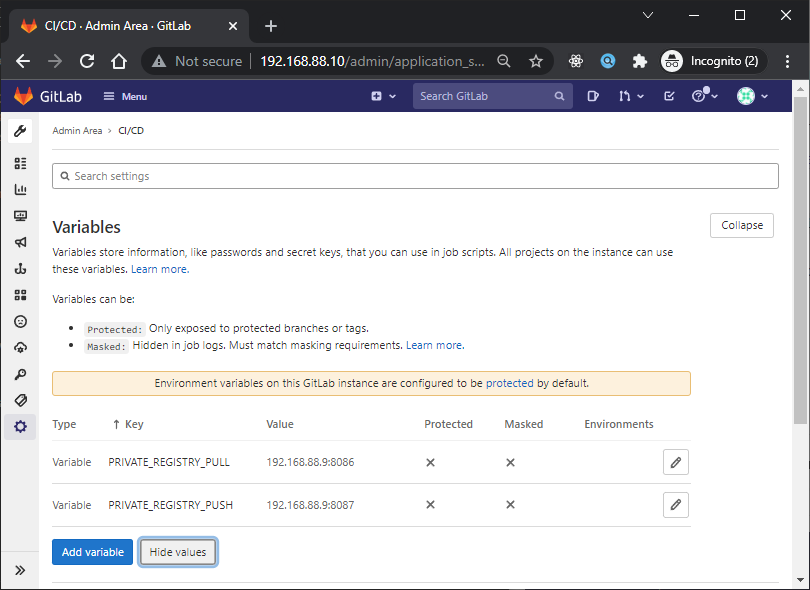
For example, create variable instance for global variable
- key:
PRIVATE_REGISTRY_PULL, value:192.168.88.9:8086, protect:un check - key:
PRIVATE_REGISTRY_PUSH, value:192.168.88.9:8087, protect:un check
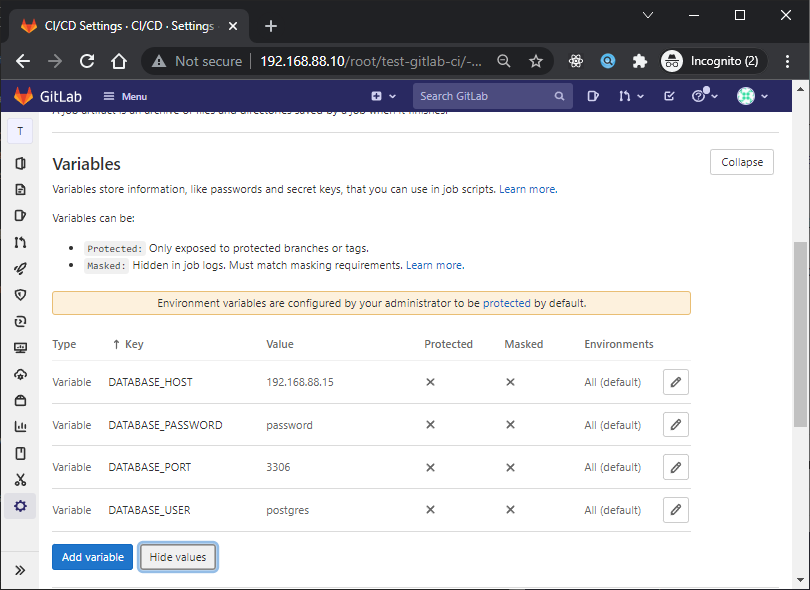
then for secret such as password credential, we can create variable at project level
- key:
DATABASE_HOST, value:192.168.88.15 - key:
DATABASE_PORT, value:3306 - key:
DATABASE_USER, value:postgres - key:
DATABASE_PASSWORD, value:password
or you can define in .gitlab-ci.yaml.
variables:
  VARIABLE_NAME: variable_value

job-name:
  variables:
    VARIABLE_NAME_IN_JOB: variable_value
For example using/access CI/CD Variables:
stages:
- test
- build
variables:
RUBY_VERSION: 2.7.4-slim-bullseye
test-case1:
stage: test
## using $, not recommand because ambigous
image: $PRIVATE_REGISTRY_PULL/ruby:$RUBY_VERSION
script:
- ruby -v
- echo "test some files with one command:"
tags:
- docker
build-code-job:
stage: build
## using ${}
image: ${PRIVATE_REGISTRY_PULL}/ruby:${RUBY_VERSION}
script:
- echo "Check the ruby version, then build some Ruby project files:"
- ruby -v
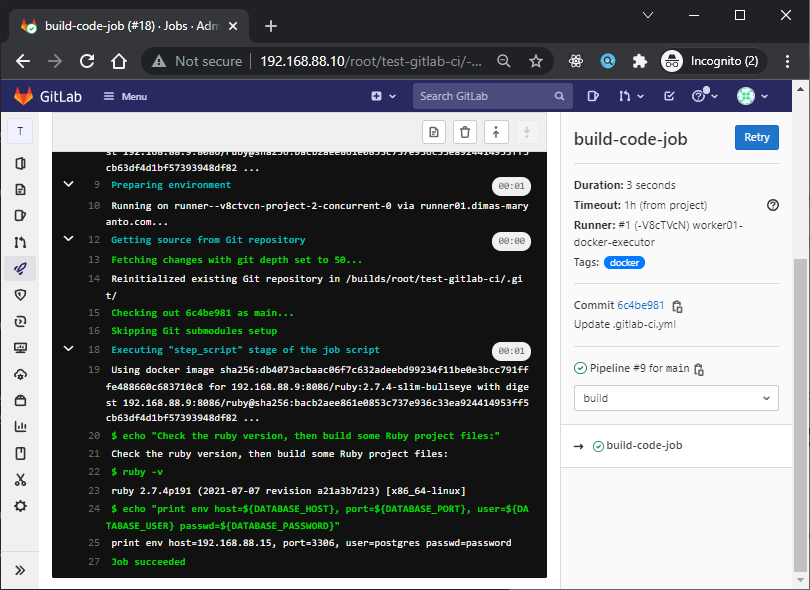
- echo "print env host=${DATABASE_HOST}, port=${DATABASE_PORT}, user=${DATABASE_USER} passwd=${DATABASE_PASSWORD}"
tags:
- dockerJika kita lihat hasilnya seperti berikut:
Using services
The services keyword defines a Docker image that runs during a job linked to the Docker image that the image keyword defines. This allows you to access the service image during build time.
The service image can run any application, but the most common use case is to run a database container, for example:
- MySQL
- PostgreSQL
- Redis
- Other docker image
It’s easier and faster to use an existing image and run it as an additional container than to install mysql, for example, every time the project is built.
You’re not limited to only database services. You can add as many services you need to .gitlab-ci.yml or manually modify config.toml. Any image found at Docker Hub or your private Container Registry can be used as a service.
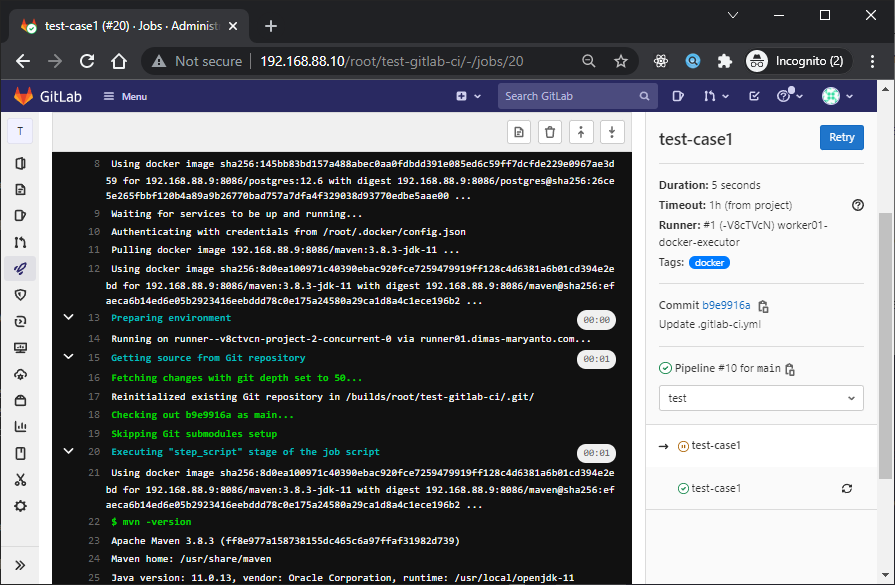
Common usage, of service to use database on integration testing. Berikut contoh implementasinya
stages:
  - test
  - build

test-case1:
  stage: test
  image: $PRIVATE_REGISTRY_PULL/maven:3.8.3-jdk-11
  services:
    - name: $PRIVATE_REGISTRY_PULL/postgres:12.6
      alias: postgres_db
  variables:
    ## set environment variable for service postgres, requirement postgres to run container
    POSTGRES_PASSWORD: ${DATABASE_PASSWORD}
    DATABASE_HOST: postgres_db
  script:
    - mvn -version
    - echo "print env host=${DATABASE_HOST}, port=${DATABASE_PORT}, user=${DATABASE_USER} passwd=${DATABASE_PASSWORD}"
    - echo "do test integration script here"
  tags:
    - docker
Jika di jalankan hasilnya seperti berikut:
Use cases to test, build, and publish docker images
Jadi dengan Gitlab CI kita bisa menjalanan script apapun yang kita mau, Dari sekian banyak contoh paling commons adalah melakukan Build docker image, dan kemudian push ke docker registry.
Tpi sebelum itu kita akan mencoba Docker in Docker yang selanjutnya nanti kita bisa kembangkan sekarang kita buat file .gitlab-ci.yaml, untuk menampilkan version dari docker client dan server serta informasi dari docker server.
setelah itu, Copy docker config file to CI/CD Variable, key: DOCKER_CONF_JSON, type: file like this
Jika kita commit & push, maka hasilnya seperti berikut:

If you have problem, dockerd not connected because
iptables v1.8.3 (legacy): cant initialize iptables table 'nat': Table does not exist (do you need to insmod?)
Perhaps iptables or your kernel needs to be upgraded.
here is solusion from stackoverflow
Cleanup your server
Setelah kita menggunakan feature Gitlab CI kita harus cleanup servernya secara berkala.
Gitlab Runner dengan Docker executor ini biasanya akan menyimpan Docker image hasil build, dan juga Docker volumenya untuk cache maka klo kita tidak cleanup lama-lama storagenya akan penuh. Untuk memanage cleanup secara berkala sebagai contoh kita bisa menggunakan script cront seperti berikut:
# login as root, then execute `crontab -e` write command below:
@weekly docker system prune -fa --volumes
Dengan script diatas, kita akan membersihkan image dan juga volume secara berkala/weekly
Yuk simak juga videonya,
Dan jika temen-temen belajar hal baru kali ini jangan lupa buat Like, Subcribe, dan Share ke temen kalian. Terimakasih!!!