


Usage docker build
Hai semuanya, di materi kali ini kita akan menggunakan docker build command untuk membuat suatu docker images. Adapun kisi-kisinya seperti berikut:
- Writing Dockerfile & Build docker image
- Run container
- Cleanup
Ok langsung ja ke-materi, pertama yang perlu kita lihat adalah seperti biasanya yaitu dokumentasi. berikut perintahnya:
Jika di jalankan maka outputnya seperti berikut:
➜ ~  docker build --help

Usage:  docker build [OPTIONS] PATH | URL | -

Build an image from a Dockerfile

Options:
      --add-host list           Add a custom host-to-IP mapping (host:ip)
      --build-arg list          Set build-time variables
      --cache-from strings      Images to consider as cache sources
      --disable-content-trust   Skip image verification (default true)
  -f, --file string             Name of the Dockerfile (Default is
                                'PATH/Dockerfile')
      --iidfile string          Write the image ID to the file
      --isolation string        Container isolation technology
      --label list              Set metadata for an image
      --network string          Set the networking mode for the RUN
                                instructions during build (default "default")
      --no-cache                Do not use cache when building the image
  -o, --output stringArray      Output destination (format:
                                type=local,dest=path)
      --platform string         Set platform if server is multi-platform
                                capable
      --progress string         Set type of progress output (auto, plain,
                                tty). Use plain to show container output
                                (default "auto")
      --pull                    Always attempt to pull a newer version of
                                the image
  -q, --quiet                   Suppress the build output and print image
                                ID on success
      --secret stringArray      Secret file to expose to the build (only
                                if BuildKit enabled):
                                id=mysecret,src=/local/secret
      --ssh stringArray         SSH agent socket or keys to expose to the
                                build (only if BuildKit enabled) (format:
                                default|<id>[=<socket>|<key>[,<key>]])
  -t, --tag list                Name and optionally a tag in the
                                'name:tag' format
      --target string           Set the target build stage to build.
Untuk membuat suatu image, paling simple adalah dengan menggunakan perintah
docker build .Yang jadi pertanyaan, yang kita build apa????
The docker build command builds an image from a Dockerfile and a context. The build’s context is the set of files at a specified location PATH or URL. The PATH is a directory on your local filesystem. The URL is a Git repository location.
Writing Dockerfile
A Dockerfile is simply a text-based script of instructions that is used to create a container image. Here is the format of the Dockerfile:
# Comment
INSTRUCTION arguments
The instruction is not case-sensitive. However, convention is for them to be UPPERCASE to distinguish them from arguments more easily. Docker runs instructions in a Dockerfile in order. A Dockerfile must begin with a FROM instruction. This may be after parser directives, comments, and globally scoped ARGs. The FROM instruction specifies the Parent Image from which you are building. FROM may only be preceded by one or more ARG instructions, which declare arguments that are used in FROM lines in the Dockerfile.
Ok sekarang kita akan coba membuat docker image, suatu aplikasi web menggunakan nginx menggunakan file html yang telah kita buat dari materi sebelumnya. Seperti berikut step-by-step nya:
- Pertama kita download dulu file index.html
- Create a file named
Dockerfilein the same folder as the fileindex.htmlwith the following contents. Please check that the fileDockerfilehas no file extension like.txt. Some editors may append this file extension automatically and this would result in an error in the next step. - open a terminal and go to the directory with the Dockerfile. Now build the container image using the
docker buildcommand.
Jika dijalankan maka hasilnya seperti berikut:
➜ 07a-usage-docker-build  pwd

Path
----
C:\Users\dimasm93\Workspaces\Example\docker\07-build-images\07a-usage-docker-build

➜ 07a-usage-docker-build  ls
Mode                 LastWriteTime         Length Name
----                 -------------         ------ ----
-a----          6/9/2021   4:51 AM             73 Dockerfile
-a----          6/9/2021   4:50 AM           2374 index.html

➜ 07a-usage-docker-build  docker build -t simple-web .
[+] Building 0.4s (7/7) FINISHED
 => [internal] load build definition from Dockerfile                                                               0.0s
 => => transferring dockerfile: 110B                                                                               0.0s
 => [internal] load .dockerignore                                                                                  0.0s
 => => transferring context: 2B                                                                                    0.0s
 => [internal] load metadata for docker.io/library/nginx:latest                                                    0.0s
 => [internal] load build context                                                                                  0.1s
 => => transferring context: 2.41kB                                                                                0.0s
 => [1/2] FROM docker.io/library/nginx                                                                             0.2s
 => [2/2] COPY index.html /usr/share/nginx/html/index.html                                                         0.0s
 => exporting to image                                                                                             0.1s
 => => exporting layers                                                                                            0.0s
 => => writing image sha256:1415cfdfc377be4b0d968bc98c79a68a801978ac3dd9383ec8be4c8ca54fe571                       0.0s
 => => naming to docker.io/library/simple-web

➜ 07a-usage-docker-build ✗  docker images simple-web
REPOSITORY   TAG       IMAGE ID       CREATED         SIZE
simple-web   latest    1415cfdfc377   4 minutes ago   133MB
Run container
Setelah image kita build, sekarang kita bisa jalankan imagenya dengan perintah docker run seperti berikut:
Jika di jalankan maka hasilnya seperti berikut:
➜ 07a-usage-docker-build  docker run --name webapp -p 80:80 -d simple-web
adb69ebc467dce9949931cf7c44290049d925195e23597c429899fcd78586bc5

➜ 07a-usage-docker-build  docker exec webapp curl localhost
  % Total    % Received % Xferd  Average Speed   Time    Time     Time  Current
                                 Dload  Upload   Total   Spent    Left  Speed
  0     0    0     0    0     0      0      0 --:--:-- --:--:-- --:--:--     0<!DOCTYPE html>
<html lang="en">

<head>
    <meta charset="UTF-8">
    <meta http-equiv="X-UA-Compatible" content="IE=edge">
    <title>Belajar HTML dari Udemy</title>

    <!--Import Google Icon Font-->
    <link href="https://fonts.googleapis.com/icon?family=Material+Icons" rel="stylesheet">
    <!-- Compiled and minified CSS -->
    <link rel="stylesheet" href="https://cdnjs.cloudflare.com/ajax/libs/materialize/1.0.0/css/materialize.min.css">

    <!--Let browser know website is optimized for mobile-->
    <meta name="viewport" content="width=device-width, initial-scale=1.0" />
</head>

<body>
    <nav class="blue">
        <div class="nav-wrapper container">
            <a href="#" class="brand-logo">Belajar HTML dari Udemy</a>
            <ul id="nav-mobile" class="right hide-on-med-and-down">
                <li><a href="sass.html">HTML</a></li>
                <li><a href="badges.html">CSS</a></li>
            </ul>
        </div>
    </nav>

    <div>
        <div class="row">
            <div class="col s12 m6">
              <div class="card blue-grey darken-1">
                <div class="card-content white-text">
                  <span class="card-title">HTML</span>
                  <p>I am a very simple card. I am good at containing small bits of information.
                  I am convenient because I require little markup to use effectively.</p>
                </div>
                <div class="card-action">
                  <a href="#">This is a link</a>
                </div>
              </div>
            </div>
          </div>
          <div class="row">
            <div class="col s12 m6">
              <div class="card blue-grey darken-1">
                <div class="card-content white-text">
                  <span class="card-title">JavaScript</span>
                  <p>I am a very simple card. I am good at containing small bits of information.
                  I am convenient because I require little markup to use effectively.</p>
                </div>
                <div class="card-action">
                  <a href="#">This is a link</a>
                </div>
              </div>
            </div>
          </div>
    </div>
    <!-- Compiled and minified JavaScript -->
    <script src="https://cdnjs.cloudflare.com/ajax/libs/materialize/1.0.0/js/materialize.min.js"></script>
</body>

</html>
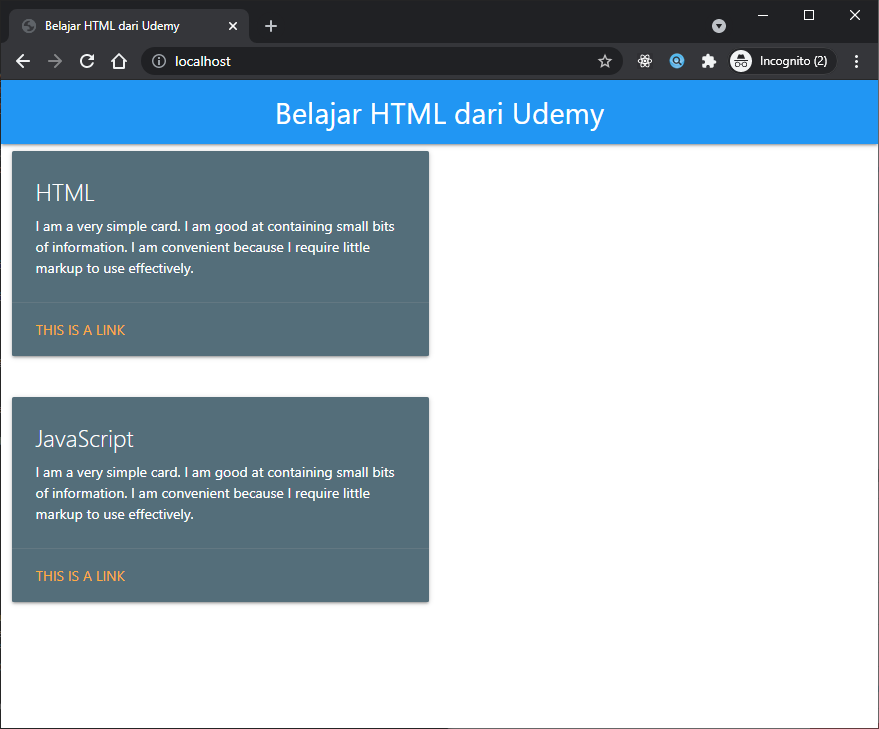
Atau klo kita jalankan dari browser dengan alamat localhost hasilnya seperti berikut:
Cleanup
Ok sekarang kita cleanup ya, berikut perintahnya:
For Bash script:
For Powershell script:
Recap
In this short section, we learned the very basics about building a container image and created a Dockerfile to do so. Once we built an image, we started the container and saw the running app.
Next, we’re going to make a modification to our app and learn how to update our running application with a new image. Along the way, we’ll learn a few other useful commands.
Yuk simak juga videonya,
Dan jika temen-temen belajar hal baru kali ini jangan lupa buat Like, Subcribe, dan Share ke temen kalian. Terimakasih!!!