


Scale services using compose command
Hai semuanya di materi kali ini kita akan membahas tentang system scale services dengan docker-compose command. Diantaranya yang akan kita bahas
- Scale up and down a service
- What happens in background
- Execute command specify container
Ok langsung aja kita ke pembahasan yang pertama yaitu
Scale up and down a service
By default docker compose akan membuat semua servicenya dalam 1 instance, now we will create a web service, try to scale this service, and add load blancer.
Berikut adalah default.template.conf file untuk nginx proxy ke backend service
Sekarang coba jalankan dengan perintah docker-compose up -d maka hasilnya seperti berikut:
➜ docker  docker-compose -f .\09-docker-compose\scale\docker-compose.yaml -p scale up -d
Creating network "scale_default" with the default driver
Creating scale_backend_1 ... done
Creating scale_proxy_1   ... done

➜ docker  docker-compose -f .\09-docker-compose\scale\docker-compose.yaml -p scale ps
     Name                    Command               State                Ports
-------------------------------------------------------------------------------------------
scale_backend_1   /docker-entrypoint.sh ngin ...   Up      80/tcp
scale_proxy_1     /docker-entrypoint.sh ngin ...   Up      0.0.0.0:80->80/tcp,:::80->80/tcp
Scale the backend service to 2 with command docker-compose up -d --scale <service-name>=<instance-numbers>:
docker-compose up -d --scale backend=3Jika dijalankan maka hasilnya seperti berikut:
➜ docker  docker-compose -f .\09-docker-compose\scale\docker-compose.yaml -p scale up -d --scale backend=3
scale_proxy_1 is up-to-date
Creating scale_backend_2 ... done
Creating scale_backend_3 ... done

➜ docker  docker-compose -f .\09-docker-compose\scale\docker-compose.yaml -p scale ps
     Name                    Command               State                Ports
-------------------------------------------------------------------------------------------
scale_backend_1   /docker-entrypoint.sh ngin ...   Up      80/tcp
scale_backend_2   /docker-entrypoint.sh ngin ...   Up      80/tcp
scale_backend_3   /docker-entrypoint.sh ngin ...   Up      80/tcp
scale_proxy_1     /docker-entrypoint.sh ngin ...   Up      0.0.0.0:80->80/tcp,:::80->80/tcp
What happens in background
Scalling service instance pada docker-compose jika kita gambarkan maka seperti berikut:
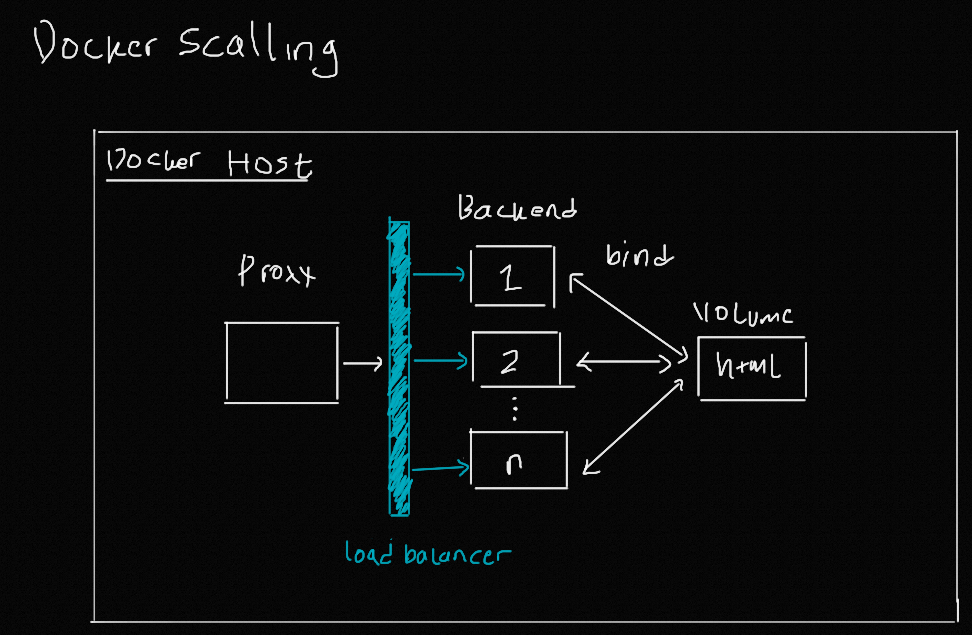
By default docker akan menambahkan loadbalancer dengan konfigurasi Round Robin
Pada contoh diatas kita melakukan reverse proxy dari service proxy ke service backend yaitu http://backend:80, dengan round-robin load balancing maka jika ada setiap request dari service proxy ke backend maka terminologinya akan seperti berikut:
- The first request is sent to
backend_1. - The second request is sent to
backend_2. - The third request is sent to
backend_3.
Sekarang coba akses localhost:80 pada browser kemudian refresh beberapa kali, kemudian access logs pada service backend dengan perintah seperti berikut:
➜ docker  docker-compose -f .\09-docker-compose\scale\docker-compose.yaml -p scale logs --tail 1 -f backend
Attaching to scale_backend_4, scale_backend_3, scale_backend_2
backend_2  | 172.20.0.3 - - [02/Sep/2021:22:10:22 +0000] "GET / HTTP/1.1" 200 3105 "-" "curl/7.78.0" "-"
backend_3  | 172.20.0.3 - - [02/Sep/2021:22:10:12 +0000] "GET / HTTP/1.1" 200 3105 "-" "curl/7.78.0" "-"
backend_4  | 2021/09/02 22:10:48 [notice] 1#1: start worker process 35
backend_2  | 172.20.0.3 - - [02/Sep/2021:22:10:57 +0000] "GET / HTTP/1.1" 200 3105 "-" "curl/7.78.0" "-"
backend_4  | 172.20.0.3 - - [02/Sep/2021:22:10:59 +0000] "GET / HTTP/1.1" 200 3105 "-" "curl/7.78.0" "-"
backend_3  | 172.20.0.3 - - [02/Sep/2021:22:11:06 +0000] "GET / HTTP/1.1" 200 3105 "-" "curl/7.78.0" "-"
backend_4  | 172.20.0.3 - - [02/Sep/2021:22:11:10 +0000] "GET / HTTP/1.1" 200 3105 "-" "curl/7.78.0" "-"
Execute command specify index of containers
Jika kita mau melakukan execute command dari suatu instance container, kita bisa menggunakan --index pada perintah docker-compose exec sebagai contoh kita akan meng-execute command pada container scale_backend_2 maka gunakan perintah seperti berikut
docker-compose exec --index 2 backendJika dijalankan hasilnya seperti berikut:
➜ docker  docker container ls -f name=backend
CONTAINER ID   IMAGE          COMMAND                  CREATED             STATUS             PORTS     NAMES
bcbe6b682276   nginx:alpine   "/docker-entrypoint.…"   14 minutes ago      Up 13 minutes      80/tcp    scale_backend_4
40ab3eb5c0ae   nginx:alpine   "/docker-entrypoint.…"   About an hour ago   Up About an hour   80/tcp    scale_backend_3
9b6a94cdd432   nginx:alpine   "/docker-entrypoint.…"   About an hour ago   Up About an hour   80/tcp    scale_backend_2

➜ docker  docker-compose -f .\09-docker-compose\scale\docker-compose.yaml -p scale exec --index 2 backend hostname
9b6a94cdd432

➜ docker  docker-compose -f .\09-docker-compose\scale\docker-compose.yaml -p scale exec --index 2 backend curl localhost
<!DOCTYPE html>
<html lang="en">

<head>
    <meta charset="UTF-8">
    <meta http-equiv="X-UA-Compatible" content="IE=edge">
    <title>Belajar HTML</title>

    <!--Import Google Icon Font-->
    <link href="https://fonts.googleapis.com/icon?family=Material+Icons" rel="stylesheet">
    <!-- Compiled and minified CSS -->
    <link rel="stylesheet" href="https://cdnjs.cloudflare.com/ajax/libs/materialize/1.0.0/css/materialize.min.css">

    <!--Let browser know website is optimized for mobile-->
    <meta name="viewport" content="width=device-width, initial-scale=1.0" />
</head>

<body>
    <nav class="blue">
        <div class="nav-wrapper container">
            <a href="#" class="brand-logo">Webapp Cources</a>
            <ul id="nav-mobile" class="right hide-on-med-and-down">
                <li><a href="sass.html">HTML</a></li>
                <li><a href="badges.html">CSS</a></li>
                <li><a href="collapsible.html">JavaScript</a></li>
            </ul>
        </div>
    </nav>

    <div>
        <div class="row">
            <div class="col s12 m6">
              <div class="card blue-grey darken-1">
                <div class="card-content white-text">
                  <span class="card-title">HTML</span>
                  <p>I am a very simple card. I am good at containing small bits of information.
                  I am convenient because I require little markup to use effectively.</p>
                </div>
                <div class="card-action">
                  <a href="#">This is a link</a>
                </div>
              </div>
            </div>
          </div>
          <div class="row">
            <div class="col s12 m6">
              <div class="card blue-grey darken-1">
                <div class="card-content white-text">
                  <span class="card-title">JavaScript</span>
                  <p>I am a very simple card. I am good at containing small bits of information.
                  I am convenient because I require little markup to use effectively.</p>
                </div>
                <div class="card-action">
                  <a href="#">This is a link</a>
                </div>
              </div>
            </div>
          </div>
          <div class="row">
            <div class="col s12 m6">
              <div class="card blue-grey darken-1">
                <div class="card-content white-text">
                  <span class="card-title">CSS</span>
                  <p>I am a very simple card. I am good at containing small bits of information.
                  I am convenient because I require little markup to use effectively.</p>
                </div>
                <div class="card-action">
                  <a href="#">This is a link</a>
                </div>
              </div>
            </div>
          </div>
    </div>
    <!-- Compiled and minified JavaScript -->
    <script src="https://cdnjs.cloudflare.com/ajax/libs/materialize/1.0.0/js/materialize.min.js"></script>
</body>

</html>
Yuk simak juga videonya,
Dan jika temen-temen belajar hal baru kali ini jangan lupa buat Like, Subcribe, dan Share ke temen kalian. Terimakasih!!!